This is the Fifth and Final part for Step by Step: Install, configure, and Deploy Project Server 2013 Article,
Article Content’s Index:
- Part 1: Overview and Prepare for a deployment of Project Server 2013
- Part 2: Install and Configure Project Server 2013
- Part 3: Configure Project Server 2013 Application Service
- Part 4: Deploy Project Web App with a new site collection – Project Server 2013
- Part 5: Deploy Project Web App in an existing site collection – Project Server 2013
Deploy Project Web App in an existing site collection – Project Server 2013
For this post I create a Web Application with Top-Level Site collection. In Top-Level site, there is no link forPWA Setting in Site Action Menu. We want to enable PWA for this site collection
Deploying an instance of Project Web App to an existing site collection consists of the following:
- Enable the Project Web App site collection features
- Create a Project Web App site in an existing site collection
These steps will be created using PowerShell Script.
Enable the Project Web App site collection features
Enabling the Project Web App site collection features adds additional functionality to the site collection that allows you to import SharePoint list projects into Project Web App.
- Create a Project Web App database
A Project Web App database is created using the New-SPProjectDatabase Windows PowerShell cmdlet. In order for the new database to be properly associated with the site collection where you want enable the Project Web App site collection features, you must use the Tag parameter to associate a unique string with this database. That string will be used later when you enable the site collection features, the script is:
New-SPProjectDatabase –Name DatabaseName -ServiceApplication “ServiceApplicationName” –DatabaseServer SQLServerInstance -Tag String
So, in our example, we will use the following parameters for script:
New-SPProjectDatabase -Name “PS15_PWA2_DB” -ServiceApplication “Project Services Application” -DatabaseServer “AliDev-SQL” -Tag “PWA2DB”
Once you have created the new Project Web App database, the next step is to enable the Project Web App site collection features. Doing so will associate the database that you just created with the site collection.
- Enable the Project Web App site collection features
The Project Web App site collection features are enabled by using the Enable-SPFeature Windows PowerShell cmdlet. Prior to running this cmdlet, you must set the PWA_TAG parameter of the site collection to match the Tag parameter that you set when you created the database.
The PowerShell command is:
$web=Get-SPWeb SiteCollectionURL
$web.Properties[“PWA_TAG”]=“String”
$web.Properties.Update()
Enable-SPFeature pwasite -URL SiteCollectionURL
So, in our example, the parameters will be:
$web=Get-SPWeb http://alidev-sp2013:30
$web.Properties[“PWA_TAG”]=”PWA2DB”
$web.Properties.Update()
Enable-SPFeature pwasite -URL http://alidev-sp2013:30
- After the Project Web App site collection features have been activated for the site collection, you can add a Project Center web part and begin importing SharePoint list projects into Project Web App.
Create a Project Web App site in an existing site collection
You can add a Project Web App site to an existing site collection. Doing so will allow you to take full advantage of Project Server 2013 and Project Web App functionality for the projects in that site collection.
In order for a Project Web App site to function properly, the site collection must have a Project Web App database associated with it and the Project Web App site collection features must be enabled. If you have not already done so, create a Project Web App database and enable the Project Web App site collection features on the site collection where you want to deploy the Project Web App site.
To create a Project Web App site in an existing site collection, you run the Windows PowerShell cmdlet to create the site and then run the Upgrade-SPProjectWebInstance to perform post-provisioning actions, including creating a Business Intelligence Center.
Use the following script to create the Project Web App site:
- New-SPweb -URL SiteCollectionURL/PWASiteName -Template pwa#0
- Upgrade-SPProjectWebInstance -Identity SiteCollectionURL –Confirm:$False
in our example, we will use the following parameters for script:
- New-SPweb -URL http://alidev-sp2013:30/PWA -Template pwa#0
- Upgrade-SPProjectWebInstance -Identity http://alidev-sp2013:30 –Confirm:$False
After you have created the Project Web App site and run Upgrade-SPProjectWebInstance, you must runiisreset on each application server in the farm.
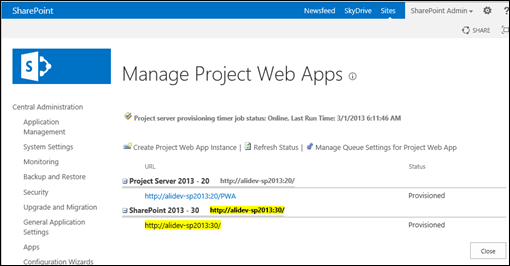
Open the Project Services Application from Central Administration, and check if PWA site Status isprovisioned

The Project Web App site is now available at the URL that you specified.
I hope this was useful for you ![]()


